Christmas will soon approach us in few days and we all are busy in preparations and decorations for the house.
If you love decorating for Christmas with angels then it’s time for you to check out the list provided here and enjoy some DIY ideas for your little ones. A simple and adorable way to add a special meaningful look to your home during the festive season.
The story of Christmas is infused with the presence of angels which makes it a perfect time to create a pretty angel craft.
Kids’ angel crafts have a lot of easy ideas for Christmas decorations. Most of the craft ideas are ornaments which can be altered to become pins, gift packs and magnets. Swapping some of the materials such as substitute craft foam for card stock or felt is also possible.
Here we bring you the list of angel craft ideas to choose from:
ANGEL CRAFTS FOR KIDS – CHRISTMAS
Christmas Angel Coloring Craft:

Simply take a print out, color it, cut it and then display it on the wall or on top of a Christmas tree. Your kid can also line it up on the class room window sill or mantel piece. All you and the kid has to do is color and cut it out, fold in half and trap a ribbon beneath the fold and stick both the sides together using a glue stick or a double sided tape and hang it on the Christmas tree. Use it as a Christmas card.
Christmas Angels:
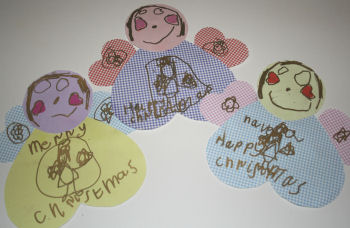
Print the template and use it to cut the shapes, decorate it and assemble. You can embellish plain shapes in different ways with gold stars, sequins, felt tip pens, etc. Pen down your own personalized message on the angel and use as it is or stick it to the front of a folded card. Draw your own desired faces and hair. You can also make 2 angels back to back and stick together to hang it up with a loop of cord between both.
Cup and Ball Angel Craft:
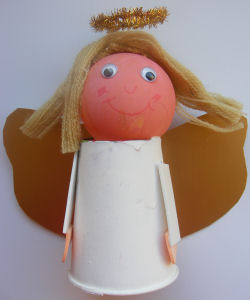
This is a special and a wonderful craft for kids of all ages. You can make it a part of your homemade native scene or sit on top of the Christmas tree.
For this you will need: Paper Cup, Polystyrene Ball, White and Pink Paint, Wiggle Eyes, Yellow Wool, Gold Card, White and Pink Craft Foam, Gold Pipe Cleaner, Glue, Sticky Tape and Pink Pen.
Directions:
Glue the ball to the bottom of the cup and paint both ball and the cup in pink and white color respectively.
From white foam, cut two arms and from pink foam, cut two hands. Glue each hand to the arm and other end of the arms to the body.
For hair, glue some wool.
By twisting a pipe cleaner, make a halo in shape and tape it to the back of the head.
From a gold card, cut wings and glue them to the back of angel. Lastly, add 2 eyes and draw on a face.
Wooden Spoon Angel:
An easy Christmas craft for every kid is this wooden spoon angel. It will make a wonderful and beautiful puppet to play with and will look adorable on your tree.
For this you will need: Wooden Spoon, Pink Paint, White and Pink Felt, Yellow Wool, Gold Card, Gold Pipe Cleaner, Pink Pen, Glue, Sticky Tape and Wiggly Eyes.
Directions:
Take your wooden spoon and paint it in pink color and set aside to dry.
Cut a quarter circle of white felt to make the dress and roll in to a cone around the spoon. To secure it, glue around the neck and up to the back of the cone.
From white foam, cut two arms and from the pink foam, cut two hands. Glue the hands to the end of arms and other ends of the arms to the body.
For hair, glue on some wool.
By twisting a pipe cleaner, make a halo in shape and tape it to the back of the head.
From a gold card, cut wings and glue them to the back of your angel and lastly, add eyes and draw on the face.
Wooden Spoon Angel 2:
This angel craft needs a spoon, gold fabric and basic crafts to produce a family heirloom which can be brought out every year.
Leave the edges raw with simple stitching in places. You need to use glue and an elastic band which all adds to the charm and makes the angel worth making by young kids.
For this you will need: Wooden Spoon, 2 pieces of fabric for dress, 1 piece of tulle, netting or lace for the skirt, Wide ribbon for the wings, Scraps of wool, cord or braid for the hair, Ribbon for hair, Elastic Band, Needle and Thread, Glue Gun, Red or Pink Coloring Pencil and Felt Tip Pens.
Directions:
Measure and cut the fabrics: Take measurements of your wooden spoon and multiply by 1.5. This is measurement A.
From the neck of the wooden spoon to the end of the handle, measure again and add 1 inch. This becomes measurement B.
From the neck of the wooden spoon to the end of the handle, measure again and add 2 inches. This becomes measurement C.
The dress of angel has 3 layers; gold design layer on top, gold on cream as the middle and an underskirt of white voile.
Cut your fabrics in this way:
Top layer: A * B.
Middle layer: A * C.
Underskirt: A * C (is you want to show the skirt) or else A * B (if you want to hide it).
You can use pinking shears if you like.
Stitch the dress: Layer the fabrics with measurement A being on top and then thread a needle and knot one end of your thread. Run a simple but large running stitch of about half an inch down from the top edge and stitching through all the 3 layers in one go. Gather up the fabrics until they fit around the neck of the wooden spoon, leave the needle on. On the spoon’s neck, dab a small amount of glue and fix the fabric in place so that the opening runs down the spoon. Stitch a bit to keep it intact.
Once done, the top edge of the three fabrics will form a ruffle around the neck of the angel.
Make the Wings: Take a ribbon, cut a 22 inch length and fold in half. With a pencil, mark a center point and fold the edges into the center but slightly overlap them. At the center point gather together and wither stitch or use an elastic band to secure it in place. The elastic band can be covered with another strip of ribbon if you want.
Attach the Wings: With the help of stitches or glue, attach the wings at the back of angel. Make sure the center point should cover the opening at the back of the dress.
Angel’s Hair: Cut a 5 inch length of gold braid and stick it to the top of the wooden spoon and top it up with a ribbon and tie a bow.
Add a Face: With the help of a black felt tip pen and a red coloring pencil for the cheeks, make a face.
Window Angel Craft:

Make an angel which will help your child to decorate the windows of their bedroom or living room for holidays.
For this craft idea you will need: Skin Tone Card, Thread or Wool, Gold Tissue Paper, Gold Pen, Tracing Paper, Gold Pipe Cleaner, Felt Tip Pens and Glue Stick.
Directions:
For angel’s wing, cut a heart shape from tracing paper and decorate it with a gold pen.
From a gold tissue paper, cut a triangle and glue it on the tissue paper wings.
From a skin tone card, cut a circle and glue it to the point of the triangle. For angel’s hair, cut some strands of wool and glue it on.
Take a pipe cleaner and fold it in half and form a loop in the center. Stick to the head by twisting the ends together.
Draw on a face and it’s good to go.
Stick it on the window and watch the sun shining and sparkling it.
Paper Plate Angel Craft:
Transform your paper plate in some simple angel craft idea for your kid and see them cheering up whole day. It is easy, quick and a unique idea for your young child to make their festive season a special one.
For this décor idea you will need: Paper Plate, Flesh Colored Card, Gold Card or Paper, Wool, Glue, Sequins, Stickers and other decorative pieces.
Directions:
In the center of a plate, draw a circle and cut 4 triangles from the outside to a point at the inner circle. Once done, it will leave you with 4 spokes.
To make a head shape cut one of the spokes in a circle.
To form a halo, stick a gold card or a paper behind the head.
On top, for the head stick a circle of flesh colored card and add some wool for hair.
Use sequins, stickers, pens and other decorative items to decorate the wings and you are good to go with it.
Little Angel Tree Topper:
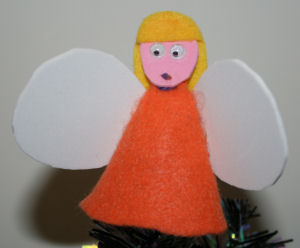
The little angel is a delightful and unique way to crown the Christmas tree which is just needed to be made in a simple way which gives your child a sense and feeling of achievement. You can keep it simple or add some glitters, tinsels and gems for making a traditional Christmas angel.
For this idea you will need: Felt Scraps or a Card for Body and Hair.
Craft Foam or a Card for Wings and Face.
Felt Tip Pens.
Googly Eyes.
Glue and Sticky Tape.
Craft Wire and Glitter for Halo (Optional).
Directions:
Depending on your materials, you can design different angels. Work according to the needs and demands of your kid or let him / her be creative with alternatives or go with what you have.
From a felt or a card, cut a semi circle first and roll to form a cone shape and join. Use a simple row of stitches or glue or double sided tape.
From a card or craft foam, cut a small circle for the face and add the features and with a dab of glue stick it to the top of the cone.
Cut a semi circle from yellow felt for a fringe and attach to the front of angel’s face and another piece of yellow felt for the rest of her hair attached to the back. Use a craft wire to make a circle dipped in white glue and then in to silver and gold glitter if you want your angel to have a halo.
For the wings, cut a figure of 8 – shape from the card or white craft foam. Handmade paper or a tissue can also be used.
Decorate it the way you like or the way your kid wants it. Add sequins, glitters and button jewels. If you have used a card then you can also draw designs on it with silver and gold pen.
Paper Towel Roll Christmas Angel: The toilet paper roll angel with coffee filter wings really a fun craft to work on. It helps focus on the meaning behind the festive season. From an angel’s perspective, have a talk with your kids about Christmas’ story.
For this, you need to take a paper towel roll and cut it in equal halves and then paint it. Draw a pencil line and paint it with 2 different colors; one color above the pencil line and other color below the pencil line.
Take a yellow paper and cut strips for hair and bangs.
With hot glue add hair and sequin neck line. You can also glue a shiny pipe cleaner halo.
With a black marker, draw the face and googly eyes.
Once done, paint some color around the edges of the coffee filter. You can use two filters together.
Fold the coffee filter in half and wrap it around the body and glue it in place of the arms.
Hot glue the wings in two different layers.
Feather and Pipe Cleaner Angels:
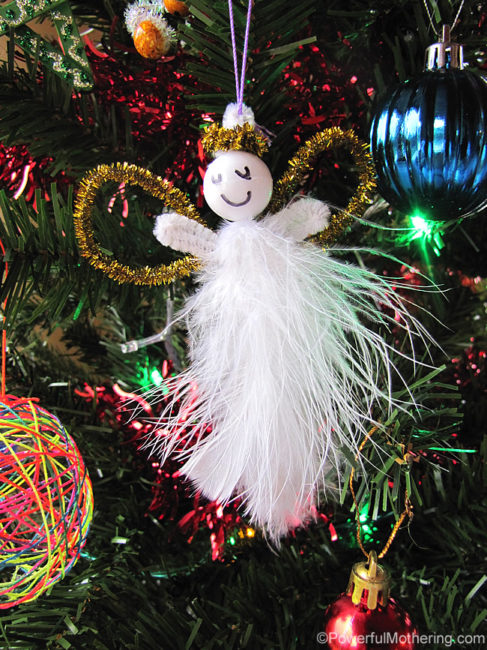
If you have been waiting and wanting to make the best angel craft for your kid then wait no more. Here we bring you something which is classy as well as a must needed ornament for this season which you can easily make at your home for your child and what can be a better option than feathers?
The DIY idea is simple and therefore, you can simply ask your kid to make it with you just being a helping hand.
To make this DIY idea for your kid you will need: 2 to 3 Feathers, 3 Pipe Cleaners, A bead, Sharpie, String.
Directions:
Gather up all your items in one place along with your kid.
Take a pipe cleaner and fold it in half and slide it on the bead for the head and twist the lower end for arms.
Take another pipe cleaner, fold in half and loop to give it a shape of wings.
Make a halo by cutting the last pipe cleaner and twisting on the finger and folding the ends over the main halo to secure it.
In the loop of pipe cleaner above the head, attach a hanging string.
To rest on the bead head, slide the halo over the hanging string.
Attach wings.
Between the bead hole and pipe cleaner, stick 2 to 3 feathers and trim the long ends which stick out.
Draw a face on the bead and you are done.
Here comes an end to the list of latest trending ideas. Check them out and try making it. Do not forget to include your kids during the process to enhance their creativity.
MERRY CHRISTMAS!

